The flick and crash is a roasting term coined by Scott Rao in his book titled The Coffee Roaster’s Companion. The term is part of his second commandment of roasting and it defines an event that can occur around the time of first-crack and again around second-crack. It can have many causes, which we’ll explore later in the post. The crash is an event that normally happens immediately after the flick.
Caveat emptor; even Rao states that these are guidelines.
Please don't take the word "commandment" too seriously. One may transgress some of these rules harmlessly on occasion. As with a certain other list of commandments, however, if you make the habit of ignoring the rules, you might end up in a bad place
(Rao, 2014)
See also: The Coffee Roasters Companion By Scott Rao
There are many different ways to roast coffee and many ways to achieve the desired roast profile. Understanding what the flick and crash events are, what causes them, what effects they have on the roast, and ways to avoid them will improve your roasting skills, even if you don’t always avoid flick and crash. There are many things going on in the roasting environment that we still don’t understand. Roasting is a very complex event. As roasters, we should always be prepared to have our theories disproved and always be receptive to new theories—with an appropriate level of skepticism of course. Do your own experiments. Roast, cup, and analyze each batch. If you find you like the flavors caused by the flick and crash, then by all means, let your roast flick and crash. The truth is always in the cupping results and what you—and your customers if you are selling—prefer.
You can view the settings I use in Artisan to track RoR here (These settings were from Artisan v. 1.x).
Interpreting Roast Data
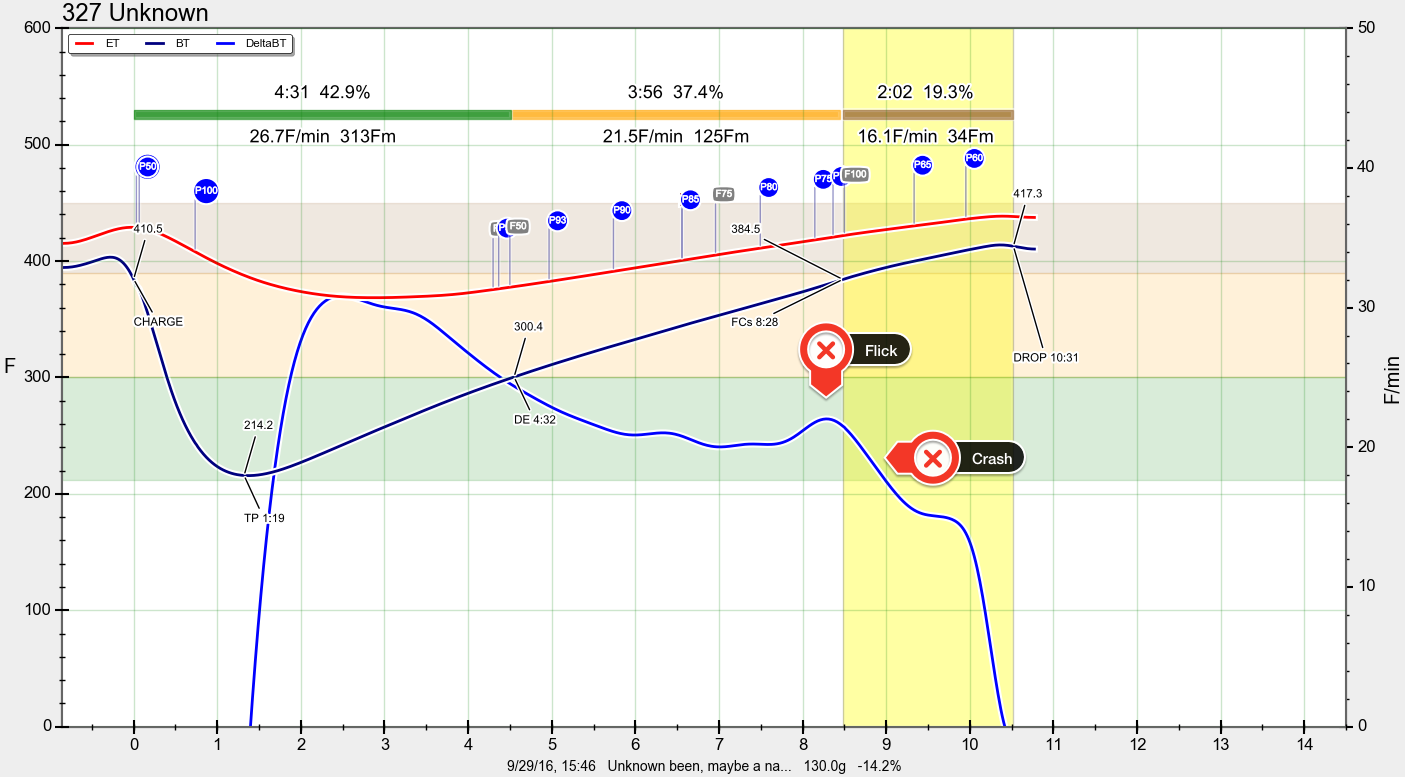
The image above is from Artigan Roaster Scope, an open-source, free roasting software. I use Artisan to interface between my laptop and my HotTop roaster. Using the software as well as an Arduino-based microcontroller that I’ve installed in the roaster, I am able to control the roaster from my laptop. As I make control changes within Artisan, the software annotates the graph to indicate the exact time and temperature of the control change.
See also: Understanding The Roast Profile
For a bit of explanation on what all is represented in the image above; the red line indicates the air temp inside the drum, which I have labeled the environment temperature (ET). The dark blue, increasing line indicates the temperature read from within the mass of beans rolling around inside the drum, which I have labeled the bean temperature (BT). The light blue, (mostly) decreasing line indicates the rate-of-rise (RoR) of the bean temp.
RoR
The RoR is a moving-average of the BT and is one indication of roasting momentum. When the RoR is decreasing, that means the bean temp’s rate of increase, or rise, is decreasing. The angle of the RoR can be an indication of the degree or rate of change. The steeper the angle downward, the faster the rate of decreasing momentum.
Think of it like driving a car; as you approach a red light, you start to let off the gas, but you’re still giving it gas. You’re still providing energy for forward momentum, just a steadily-decreasing amount.
In the following video clip, Neal Wilson describes the rate of change (rate of rise) and how he uses it to understand the momentum of his roast and to ensure back-to-back roasts are consistent:
The Flick
In Figure 1, the flick starts around the 8-minute-mark of the light blue line. It can be seen as the sudden increase in the rate-of-rise. It indicates that the roast momentum is no longer dropping as it always should in order to conform to Rao’s guidelines.
The flick is initiated when chemical reactions within the beans switch to an exothermic state and begin producing heat, rather than absorbing heat. The beginning of this, Rao calls an exothermic flash. If the operator doesn’t anticipate the new source of heat in the roast, the RoR will increase or “flick” momentarily.
The underlying cause of the flick can be several things; too much momentum leading up to first crack (FC), too much heat in the circulating air within the roaster drum, too much heat in the metal parts of the roaster itself, especially the drum, the beans have gone exothermic and are adding heat to the environment, etc. The most basic explanation is there is too much heat and you risk losing control of the roast.
In the image above, I believe there is too much momentum and FC is introducing more heat into the environment and the combination of the two caused the flick. I did not do a good job of anticipating the sudden increase in heat caused by the exothermic reactions of FC. When the beans went exothermic, the added heat pushed the momentum in a positive direction.
The Crash
Again in the image above, looking at the light blue, decreasing line, the crash is the steep drop immediately after the flick. Like the flick, it can be caused by a number of things; the beans no longer producing enough heat to significantly affect the momentum and/or control changes made in response to FC.
In the example above, the crash was likely caused by a combination of things; the end of significant exothermic activity in the beans as well as control changes I made to the roaster; an increase in fan speed and a decrease in power.*
Avoiding The Flick and Crash
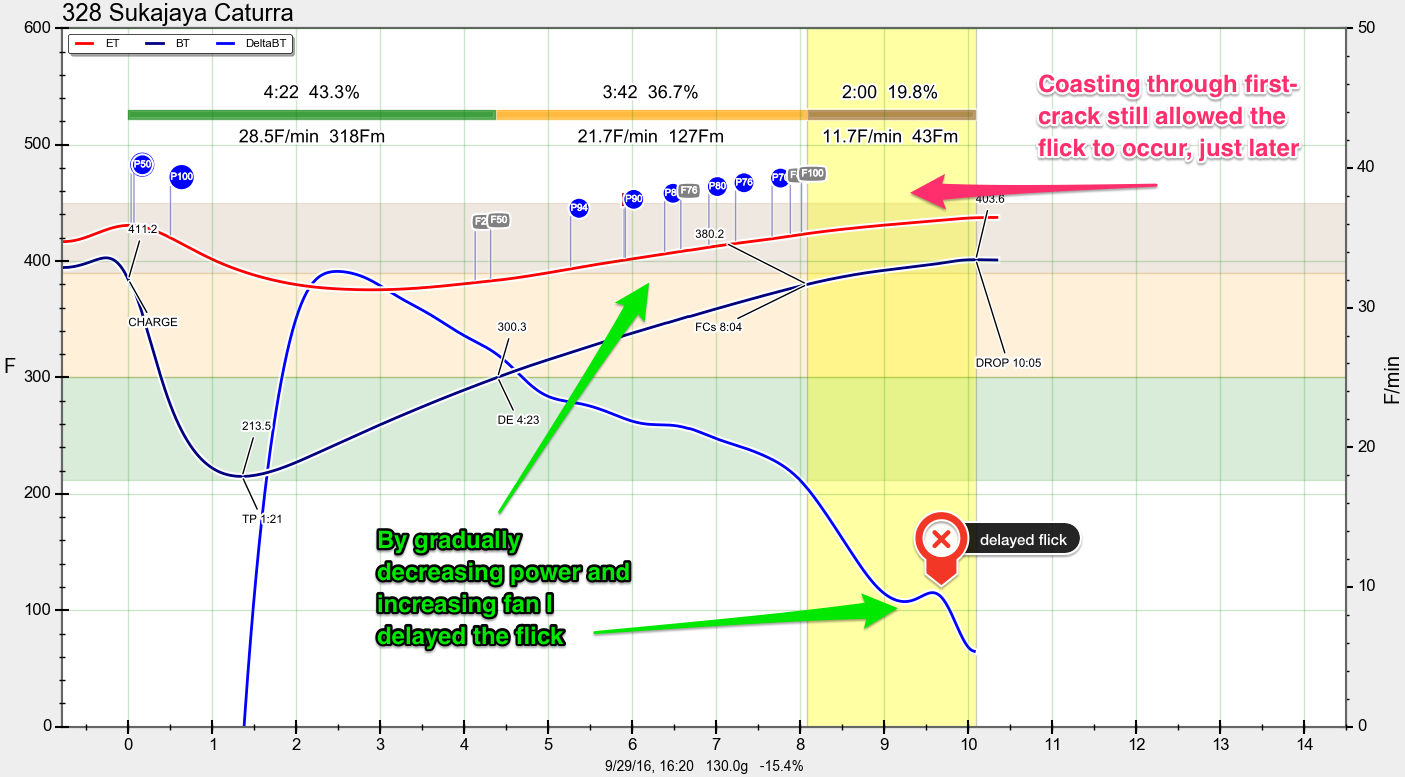
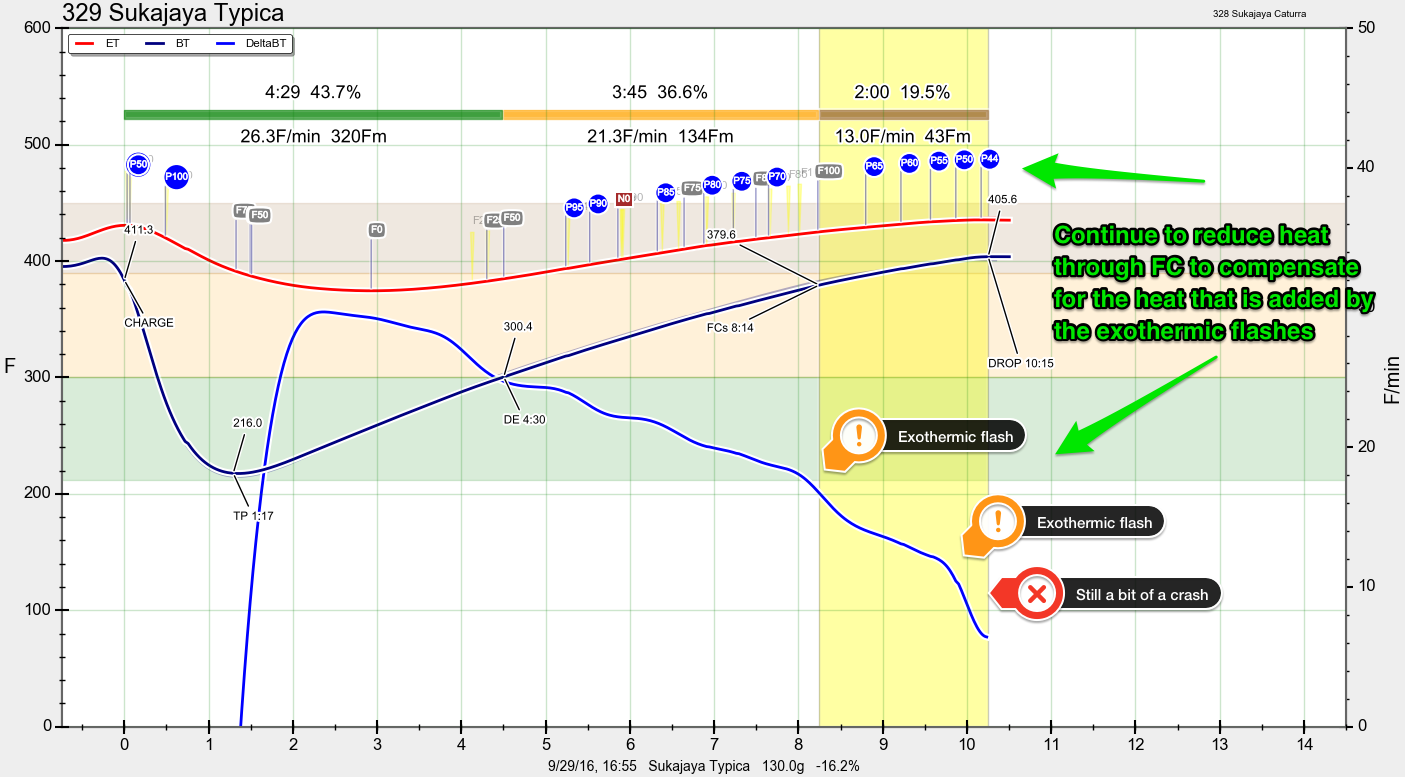
Figure 2 represents a new roast, performed right after the previous roast as I try to avoid the flick and crash. In both roasts, when the ET hit 390°F I started steadily decreasing the power, indicated in the image by the blue circular annotations with Px to indicate the new power level setting. In Figure 1 (roast #327) the changes were less frequent and further apart. In Figure 2 (roast #328) you see I made more frequent changes to the power. For roast #328, I got the power down to 65 just before FC and in #327 power was at 75 just before FC, a 14% difference in applied heat. I also made an additional adjustment to fan speed in #328. For roast #327, fan speed was at 75 until the onset of FC. In #328, I set the fan speed to 85 at 7:51, in anticipation of FC.
The results of the changes moved the flick and crash later in the roast. I still had a bit of a crash just after the onset of FC because I continued to set the fan to 100 immediately at the onset of FC. But moving the flick and crash is progress!
- Minimize the number of different types of changes you make to the roast, i.e. don't change your charge temperature and also change your heat and airflow application. (reduce the number of variables)
- Do back-to-back roasts of the same bean to further minimize variables.
- Cup the coffees and add the cupping data to your roasting data (do this with every roast).
- Rao, S. (2014). The Coffee Roaster’s Companion. Scott Rao; 1st edition (2014).
Value 4 Value
If you found this content useful, please consider supporting my work. I charge no set fee or price for providing this. You can help keep information like this openly accessible by matching the value you received in the content; value 4 value.Ko-fi / Bitcoin Wallet: 32SW9kcAsJdZvQKBazhLUZBSD9YS8DDqe8


